FLAME User Guide
This comprehensive guide will walk you through setting up and using FLAME for collaborative design environments that use XTEAM. The XTEAM design environment estimates memory usage, energy consumption, and message latency of message-oriented systems.
Note: This guide uses XTEAM as an example design environment. You may need to integrate FLAME into your specific design environment based on your project requirements.
System Architecture
FLAME deployment consists of three main components:
- Server-side: Central coordination and conflict management
- Detector-side: Conflict detection and analysis engines
- Architect-side: Client interfaces for architects

Figure 1: High-level architecture of FLAME
Setting up FLAME Components
Architect-Side Preparation
FLAME enhances conventional copy-edit-merge collaborative software design environments with high-order proactive conflict detection. On the architect-side, FLAME uses:
- A modeling tool-specific adapter (FLAME Adapter) that captures modeling changes via the tool's APIs
- A FLAME Client installed at each architect's location to establish communication channels
Prerequisites
Operating System
- Microsoft Windows (7 SP1, 8, 8.1, 10, or 11)
- 64-bit or 32-bit versions supported
- Full incremental updates recommended
Required Software
- Java 7 or newer
- Apache Ant (for building from source)
- Generic Modeling Environment (GME) 12.12.11
FLAME Components
- FLAME Client - GitHub | Binary
- Eclipse SWT Library - Download for your OS
Setup Steps
1. Configure Java and Ant
- Add Java's
/bindirectory to your PATH environment variable - Set
JAVA_HOMEto Java's home directory - Add Ant's
/bindirectory to your PATH - Set
ANT_HOMEto Ant's home directory
2. Register the Modeling Paradigm
- Download the AssortedxADL paradigm
- Open GME
- Navigate to Tools → Register Paradigms
- Click Add from file
- Select
AssortedxADL.xmpfrom the extracted files - Click Open to complete registration
3. Register the FLAME XTEAM-GME Adapter
- Get the FLAME Adapter from GitHub or Binary
- Open GME
- Create a new project using the AssortedxADL paradigm
- Navigate to Tools → Register Components
- Click Install New
- Select
CoDesign.dll - Click Open to complete registration
4. Configure FLAME Client
- Extract the SWT.jar into FLAME Client's
/libdirectory - Update
build.xml(line 17) with your SWT version - Copy
config.properties.templatetoconfig.properties - Edit
config.propertieswith your server details
5. Configure System Requirements
Edit XTEAM_Info.dat to specify system requirement thresholds:
Server-Side Preparation
The server-side components manage connections between FLAME Clients and Detection Engines, coordinating the distribution and analysis of modeling changes.
Prerequisites
The server-side requires the same Java and Ant setup as the architect-side, plus:
- FLAME Server from GitHub
- Eclipse SWT library for your server's OS
Configuration Steps
Follow the same configuration steps as the architect-side for:
- Java and Ant environment variables
- Creating and editing
config.properties - Configuring
XTEAM_Info.dat
Detector-Side Preparation
Detection Engines are similar to FLAME Clients but operate autonomously with integrated conflict detection tools. Each Detection Engine maintains its own model version and detection capabilities.
Prerequisites and setup steps for the detector-side are identical to the architect-side configuration.
Slave Nodes Preparation
FLAME's Slave Manager component enables distributed processing by managing a pool of slave nodes for parallel conflict detection.
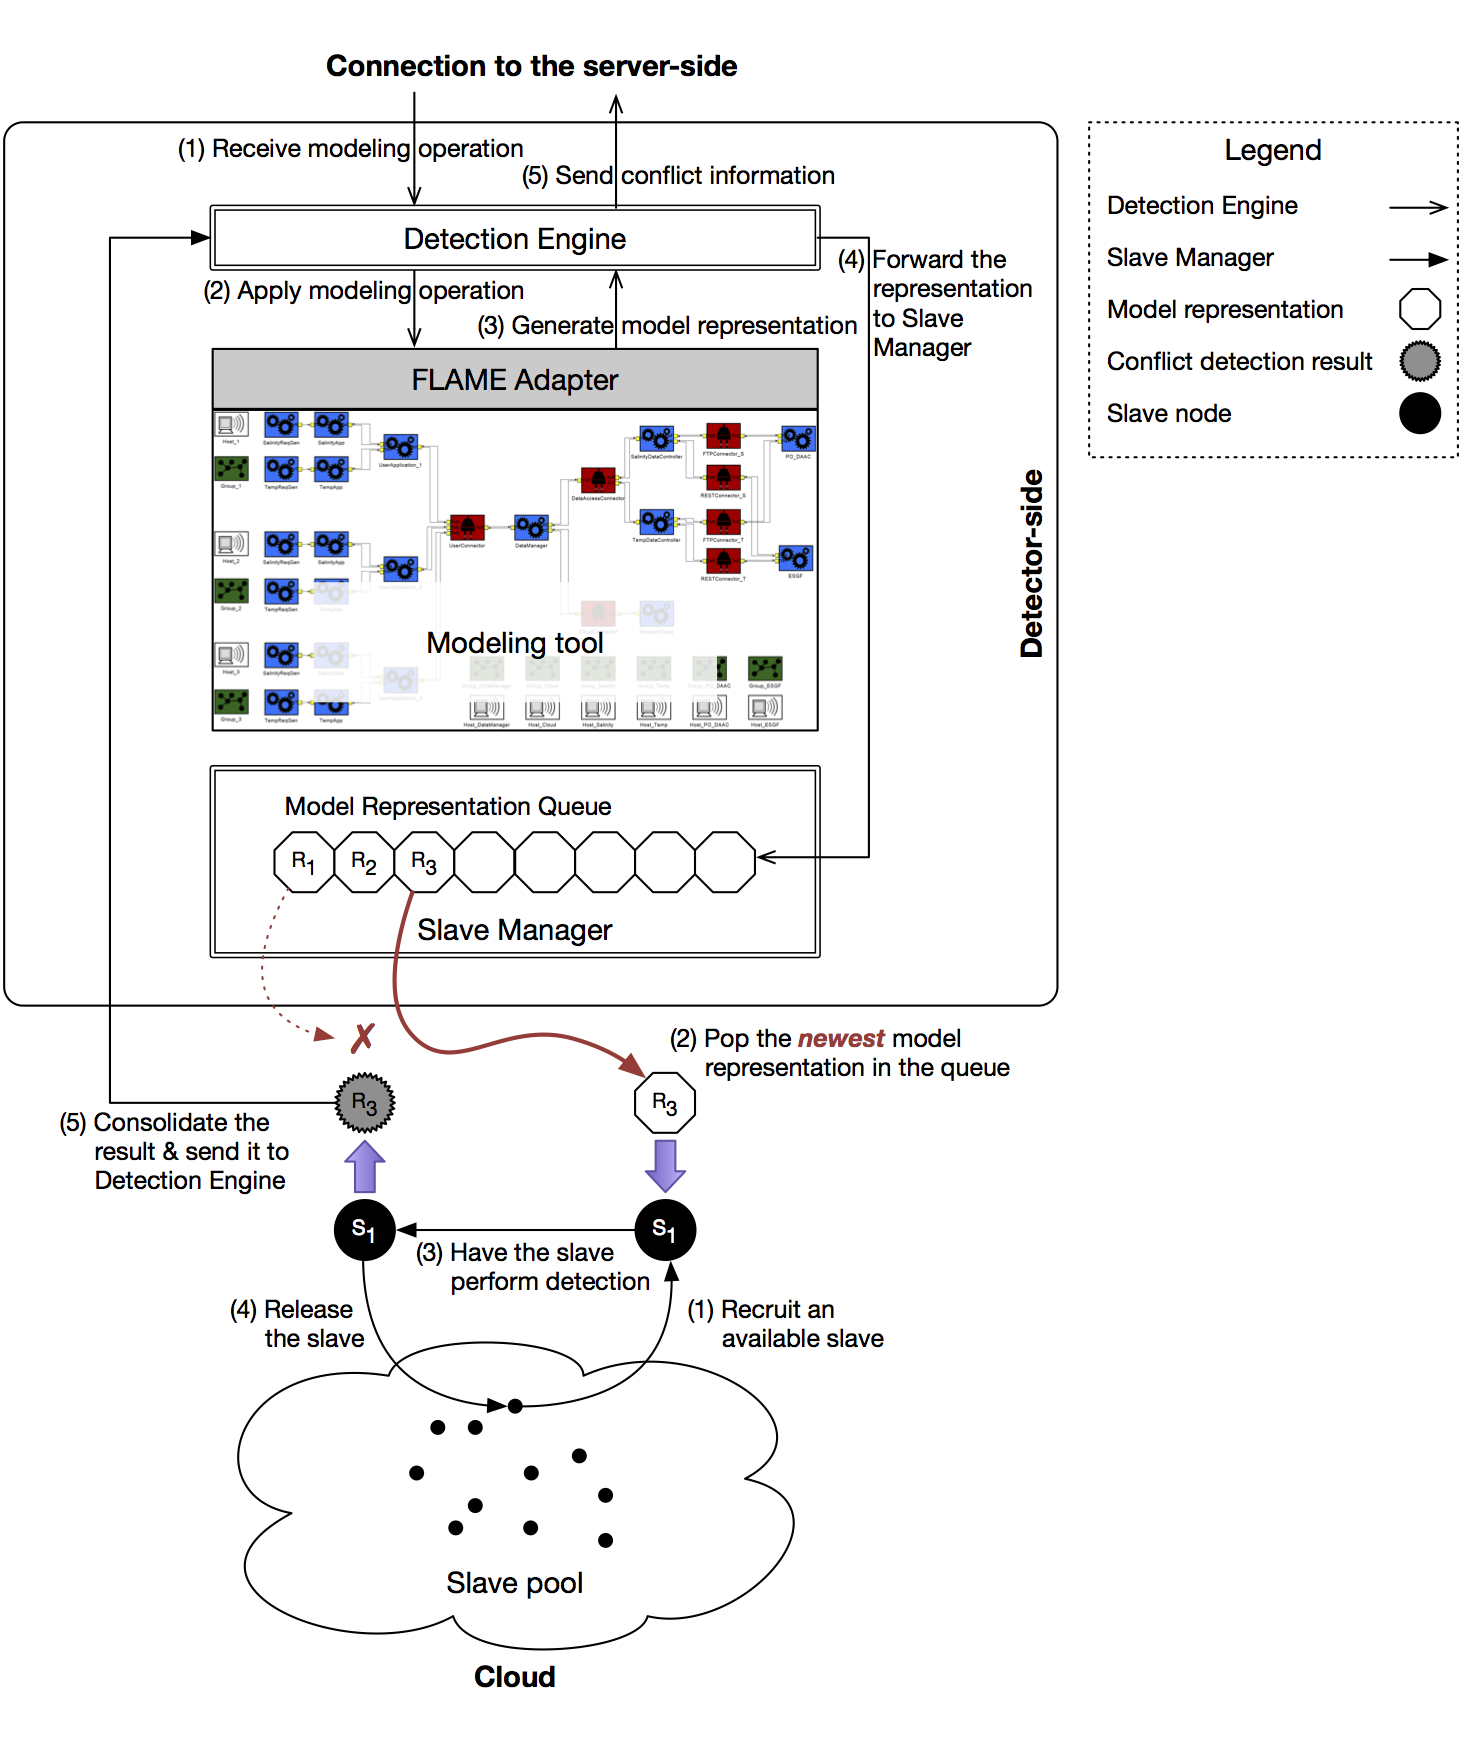
Figure 2: Detector-side architecture with slave nodes
Google Compute Engine Setup
- Subscribe to Google Compute Engine
- Download the FLAME GCE scripts
- Update
variables.shwith your GCE configuration
Launching FLAME Components
Launching FLAME Server
Launching Detection Engines
Launching FLAME Client
Final Notes
FLAME's architecture enables proactive notification of high-order conflicts before architects perform updates. This early detection significantly reduces the cost and complexity of conflict resolution in collaborative software design projects.